EMnetik Plasmid Purification System Performance Data
Plasmid Prep - Simplified
- Plasmid recovery of 4-7 µg shown for a high copy plasmid
- No need to handle small columns or use a single-channel pipette
- Move samples from the lysate to the EMnetik 24 system, and don’t move them again until final elution
- Intuitive user interface removes guesswork by providing clear, step-by-step instructions
Choose your sample input, elution and labware.

Figure 1
Figure 1 left: Yield of elutions from 2 different elution volume options (50 µL and 20 µL). The bars are the average of 8 replicates on the device, and the error bars are the standard deviation of the replicates. The left middle and right refer to the placement in the EMnetik 24 system; for example, the left most column of samples are averaged in the left grey bars. Figure 1 right: Yield does not vary widely when using different labware. The first three bars show the yield using PCR 8-strip tubes, and the second three bars show the yield using single PCR tubes. The bars represent the average of 8 samples; error bars indicate the standard deviation of the 8 samples. Tubes are as follows: A: Thermo Scientific AB-2005, B:VWR 93001-118, C: VWR 20170-002, D: Thermo Scientific AB-0337, E: VWR 20170-010, and F: VWR 20170-012
Plasmid extraction is comparable to manual cleanup protocols.
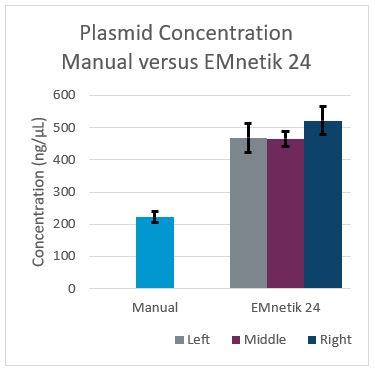
Figure 2
Figure 2: The concentration of pUC19 plasmid using EMnetik 24 and a manual bead-based chemistry were compared post extraction. The manual comparison bar is an average of 3 replicates, and the EMnetik bars are an average of 8 replicates. The error bars are the standard deviation.
EMnetik Plasmid Purification Workflow
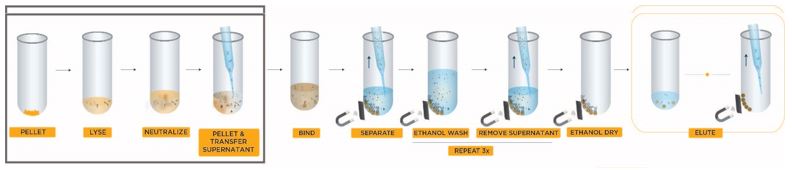
EMnetik Plasmid Purification Workflow
- Pellet your sample
- Add L1 to lyse your sample
- Add N3 to neutralize your sample
- Pellet the flocculant and remove the supernatant to a new tube
- Add your sample to the instrument
- Add your EMnetik plasmid purification bind to your sample
- Start bind mix and separate
- Remove supernatant
- Add ethanol to wash
- Remove supernatant
- Repeat steps 5 and 6
- Start your ethanol dry
- Add your eluant
- Start elution mix and separate
- Move your final elution to your preferred labware
Not intended or validated for use in the diagnosis of disease or other conditions.
© 2022 Beckman Coulter, Inc. All rights reserved. Beckman Coulter, the stylized logo, and the Beckman Coulter product and service marks mentioned herein are trademarks or registered trademarks of Beckman Coulter, Inc. in the United States and other countries. All other trademarks are the property of their respective owners.